
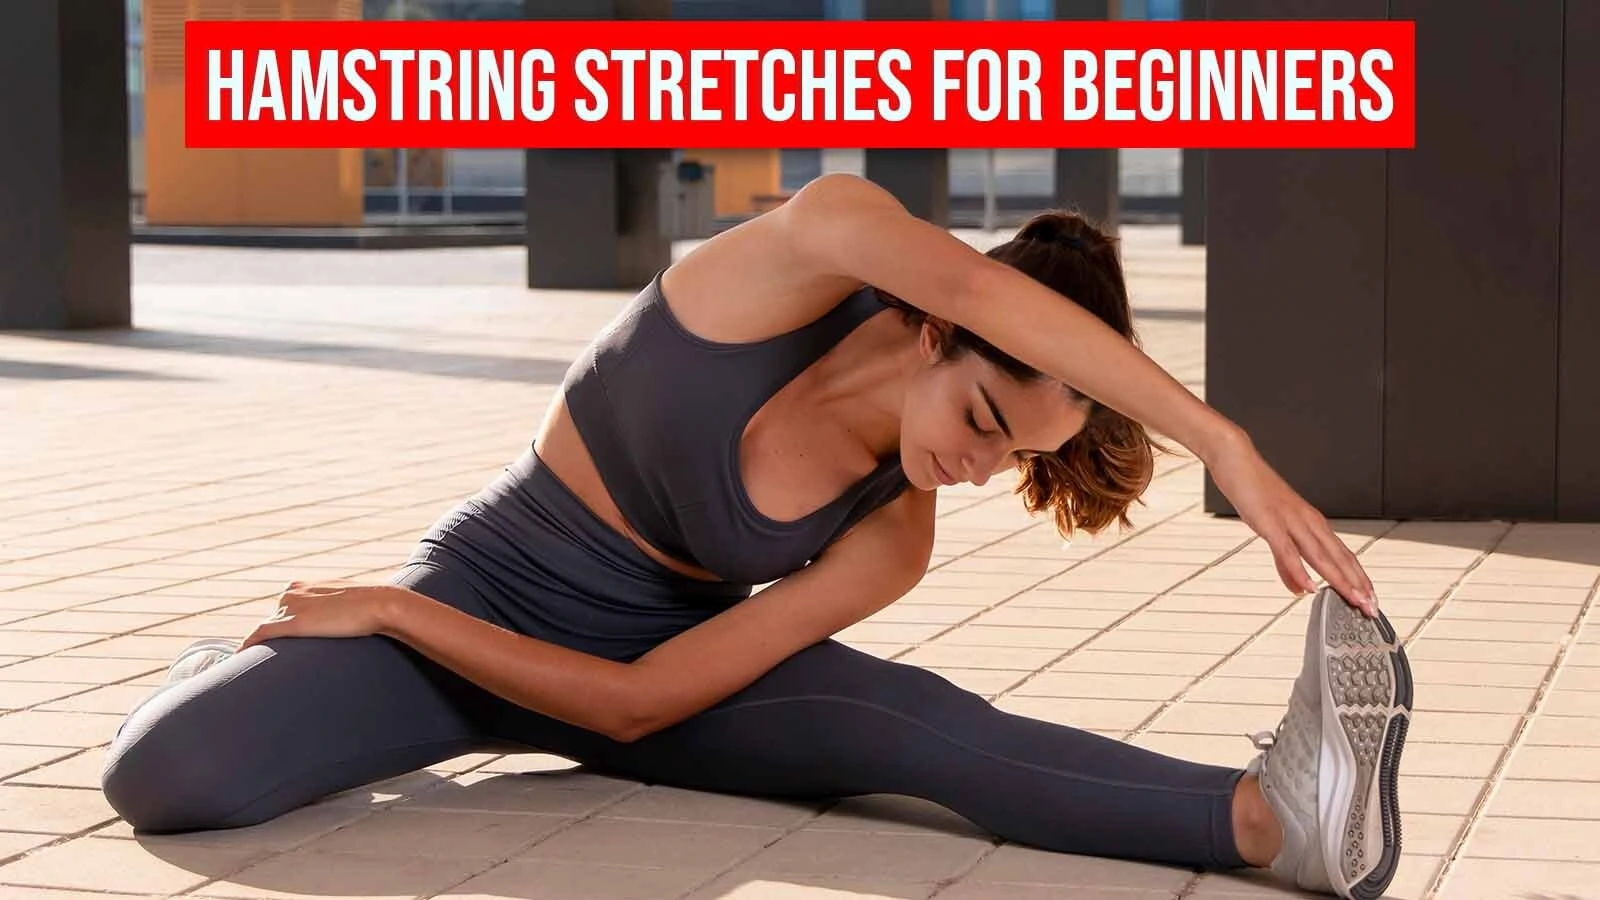

Have you ever attempted to get your feet to touch and only see your fingers hanging in a tangled mess from the floor? There’s no reason to be alone. As a certified trainer with more than 10 years of experience, I’ve helped hundreds of clients suffering from tight hamstrings—that stubborn section of muscles that runs along the rear of your legs.
What’s the best part? The flexibility of your hamstrings can improve in a matter of two weeks with the proper strategy. I’ve witnessed it happen numerous times in the studio. Even clients who were unable to extend their legs past their knees have gotten to their feet by a consistent effort.
In this complete guide, I’ll describe the exact hamstring stretches that I use in my programs for training, the same ones that have helped my students improve their flexibility. You may be looking for a better posture or decreased lower back discomfort or just would like to be able to touch your feet at first since years (or ever! ) The following 8 simple stretching exercises for the hamstring stretches for beginners will help you reach your goals.
Let’s start our journey toward greater flexibility!
Before
Why Hamstring Flexibility Matters
Before we get into the stretching, first, let’s look at the reason why flexibility in the hamstring is important:
Lower back pain: In my many years of coaching clients, I’ve observed that tight hamstrings are often a contributor to lower back problems. The muscles are attached to your sit bones (ischial tuberosities), and if they are tight, they pull your pelvis to the side and cause a change in the alignment of your spine.
Enhances Posture: A tight hamstring can make your pelvis tilt upwards, leading to a round lower back while sitting. We’ve observed remarkable improvements in posture for our clients who are just beginning their journey when their hamstrings are loose.
Enhanced Athletic Performance: Whether you’re a cyclist, runner or weekend warrior, elastic hamstrings give you greater flexibility, increasing your performance while reducing the risk of injury.
Daily Moving: Flexible hamstrings can make simple tasks like bending over to tie shoes, lifting things off your floor, or sitting comfortably much easier.
In our training facility, we measure hamstring flexibility by performing a simple seated forward fold. If you are unable to sit with your legs fully extended while keeping your back straight or if you bend forward and cause your back to turn significantly Your hamstrings may need some focus!
Before You Start: Important Safety Tips
Before we begin the hamstring stretching routine, our studio offers the following essential guidelines to beginners. We also offer you a different plan that includes wellness plans and basic stretching exercise routines.
Always warm up: Do not stretch muscles that aren’t warm. Do 5-10 minutes of gentle cardio exercises like walking around in place, taking a strenuous stroll, or a gentle cycle to increase blood flow prior to stretching.
Beware of Pain Signals: Stretching is supposed to be uncomfortable; it should not be painful. Our clients are taught to distinguish between what is known as the “good burn” of a stretch and pain. If you feel a sharp pain, you should stop right away.
Breathe through stretches: Proper breathing can help relax tension. Inhale to get ready, and exhale while you are deepening your stretch. I tell those who practice with me that holding your breath interferes with stretching.
Consistency over Intensity: At our gym, we’ve observed that stretching on a regular basis produces more results than occasional intense sessions. Try to do these hamstring stretches for beginners every day instead of doing too much at the beginning of each week.
Support Tools are Your Friends: Do not be afraid to utilize straps or towels, or even blocks. They’re not “cheating”—they’re clever tools that can help you stretch more effectively and maintain the correct posture.
Let’s start with the eight hamstring stretching exercises that will help you achieve your goals in just two weeks!
The 8 Simple Hamstring Stretches
1. Seated Forward Fold
This stretch is the one that we begin with all of our novices. It’s the most direct method of stretching the hamstrings, which allows you to manage the intensity with precision.
How to use it:
- You should lie on the floor with both legs straight out to the side.
- Stand tall with your spine, noticing your sitting bones press into the floor.
- Inhale deeply and, as you exhale, pivot at the hips (not your waist!) to fold your body forward.
- Hold your hands to your feet and go as far as you can with a straight spine.
- Keep it for 30 to 60 seconds and concentrate on relaxing your hamstrings during every exhale.
Beginner’s suggestion: In the event that you feel your hamstrings feel very tight, you can sit on a folded blanket or cushion to raise your hips a bit. This strategy will reduce the stretch’s initial intensity while maintaining proper posture.
In our beginning classes, I always stress that it’s better to have straight backs and bend less instead of bending to the side and stretching farther. The quality of your work is more important than the quantity!
2. Standing Hamstring Stretch
This versatile stretch is perfect for those who struggle with floor stretches.
How to use it:
- He stood tall, his feet hip-width apart.
- Pushing one foot forward moves it ahead by about two feet.
- Move your feet forward (toes upwards towards the ceiling).
- Maintain both the legs in a straight line (a micro-bend in your knees is acceptable if your legs are really tight).
- Engage your hips at the hips to move forward and fold over your front leg.
- Place your arms on an extended leg, or extend your reach toward your toes.
- Keep it for 30 seconds, and then change sides.
The most common mistakes to avoid: The most common mistake we see is people who are starting to round their backs to lower their backs. Instead, concentrate on the sensation of your hamstring and then only push the maximum distance you can with a straight back.
I frequently use this stretch between clients whenever I need to release quickly after doing exercises throughout the day. It’s not complicated, but it’s remarkably efficient!
3. Wall Hamstring Stretch
This is one of my personal favorites that we teach in our “Flexibility for Beginners” workshops. The wall provides excellent support and allows for a controlled, passive stretch.
How to perform it:
- Lie on your back near a wall or doorway.
- Extend one leg up the wall while keeping the other flat on the floor.
- Scoot your buttocks as close to the wall as comfortable.
- Keep your elevated leg as straight as possible.
- Flex your foot to enhance the stretch.
- Hold for 1-2 minutes, then switch legs.
Progression tip: As flexibility improves, move your buttocks closer to the wall. For an even deeper stretch, try gently pulling your leg toward you with a strap or towel wrapped around your foot.
I’ve found this stretch particularly effective for my clients with lower back issues, as the floor supports the spine completely while the hamstrings stretch.
4. Legs Up the Wall
This restorative pose is where stretching meets relaxation—perfect for evening routines when you want to unwind while improving flexibility.
How to perform it:
- Sit sideways next to a wall.
- Swing your legs up as you lie back.
- Scoot your buttocks as close to the wall as comfortable.
- Extend both legs up the wall.
- Relax your arms by your sides.
- Stay here for 3-5 minutes, focusing on deep breathing.
Why it works: The extended time and gravity’s assistance make this a highly effective stretch for beginners. In our studio, we often end flexibility sessions with this pose.
This is the stretch I recommend to all my clients to do before bed. Not only does it help with hamstring flexibility, but it also promotes circulation and relaxation after a long day.
5. Single-Leg Hamstring Stretch
This targeted stretch allows you to focus on one leg at a time, which is helpful since many people have one hamstring tighter than the other.
How to perform it:
- Sit on the floor with one leg extended.
- Bend your other leg so the sole of your foot rests against your inner thigh.
- Sit tall, then hinge at your hips to reach toward the foot of your extended leg.
- Hold for 30 to 60 seconds, then switch sides.
Intensify option: For a deeper stretch, wrap a yoga strap or towel around your foot and gently pull to increase the stretch while keeping your back straight.
In my years of training, I’ve noticed this asymmetrical stretch often reveals flexibility differences between sides. Pay attention to these differences and spend extra time on your tighter side.
6. Lying Hamstring Stretch
It is by far the best spine-friendly stretch we can incorporate into our routine, which makes it ideal for those who are new to back issues.
How to do it:
- Relax on your back and lie flat.
- Place one foot on the floor.
- Then, raise your leg to the ceiling.
- Keep your leg in the calf or thigh (avoid holding your knee behind it).
- Pull your leg gently towards your torso.
- For 30 seconds, hold the position for 30 seconds and then change sides.
Beginning variation: If getting your leg is a challenge, you can use a strap or towel wrapped around your feet to assist with stretching.
If I am teaching this stretching in our beginner classes, I stress the importance of using the floor to provide total support, allowing you to focus on the release of the hamstring and not worry about balance or the back position.
7. Seated Hamstring Stretch with Chair
Not everyone can comfortably get up and down from the floor, which is why we always include chair-based options in our training programs.
How to perform it:
- Sit toward the edge of a sturdy chair.
- Extend one leg straight out, heel on the floor, toes pointing up.
- Sit tall with a straight spine.
- Hinge at your hips to lean forward.
- Rest your hands on your extended leg or reach toward your foot.
- Hold for 30 seconds, then switch sides.
Accessibility tip: This stretch is excellent for seniors or those with mobility limitations. I’ve used the technique extensively with my older clients who find floor work challenging.
At our studio, we often recommend this stretch for people to do at their desk during work breaks. It’s discreet and effective, even in an office environment.
8. Active Hamstring Flexibility Exercise
Unlike the previous static stretches, this dynamic movement helps build functional flexibility.
How to perform it:
- Stand tall with feet hip-width apart.
- Engage your core.
- Keep your legs straight and swing one leg forward and upward.
- Control the movement with your hamstring and hip flexors.
- Start with smaller swings and gradually increase height.
- Perform 10-15 controlled swings per leg.
Why it matters: Static stretching is excellent, but adding active flexibility work helps your muscles learn to control their new range of motion. We always finish our flexibility sessions with some active work.
I’ve found this exercise particularly helpful for athletes in our programs. Dynamic nature mimics real-world movements better than static stretches alone.
Your 2-Week Progress Plan
Based on our successes with the beginners in our studio, here’s our exact 2-week plan I suggest for reaching your goal of toe-to-toe touch:
Week 1: Foundation Building
- Days 3 to 4: Do each stretch one time and hold for 30 seconds.
- Days 4-7: Perform each stretch once, then increase it to 45-second holds.
- Concentrate on the proper shape rather than on depth.
- Make note of the starting place (take photos of the area from the toes of your feet).
Week 2: Progressing Deeper
- Day 8–10: Perform the stretch twice and hold it for 45 seconds.
- Days 11 through 14: The stretch should be performed twice and held for 60 minutes.
- Focus on depth while retaining excellent posture.
- Assess your performance (compare to your beginning point).
The Daily Routine Timing: The whole routine will take about 15 minutes. I suggest doing it at night when your body temperature is typically warmer; however, consistency is more important than timing. Pick a time that you will stay with!
Monitoring Progress: In our studio, we snap photographs (with consent) that show our customers’ progress forward between the first day and on day 14. The proof of progress in the form of pictures is extremely motivating!
Tips for Consistent Improvement
After working with many students on hamstring flexibility, here are my top tips to ensure the success of your workout:
Heat helps: Try stretching after a warm shower or using a warm towel on your hamstrings prior to stretching. This tactic has helped us see progress increase dramatically.
The 70 Rule of 70 percent: Don’t stretch until the fullest ability. Keep your stretch at around 70 percent of your maximum to prevent the muscles from getting tighter. This approach is not intuitive and can lead to quicker results.
Combine Strength With: Although it isn’t covered in depth here, strengthening your hamstrings can help in flex too. Simple leg curls and bridges are a perfect complement to this stretching routine.
Hydration is Important: A well-hydrated muscle can extend more effectively. A majority of our clients report decreased flexibility after dehydration.
Be Patient with Plateaus: It’s not always linear. There are days when you feel more tight than others; such discomfort is perfectly normal. Don’t be afraid to trust the process!
Through our many years of training stretching exercises, we’ve learned that managing expectations and maintaining enthusiasm is crucial. You’ll see your progress by being constant!
Conclusion
Having guided hundreds of beginners through this hamstring stretching program, I am certain that achieving toes in two weeks is a realistic goal for those who are dedicated to a daily routine.
Keep in mind that flexibility is not only about the physical accomplishment of rubbing your toes. Our clients have reported better posture, less back pain, better sporting performance, and even greater confidence in their movement abilities.
Begin where you are now. Be consistent with these eight simple hamstring stretches and be proud of your progress. I’m eager for you to get the same results that we’ve witnessed from our training studio!
When you stretch your fingers over what you believed was possible, you’ll literally be astounded by the progress you’ve made in a couple of weeks or two weeks. Your hamstrings will appreciate it, and so will your spine, posture, and overall quality of movement.
Let’s get you started on your journey to flexibility!
FAQs About Hamstring Stretches for Beginners
Based on questions that I regularly receive during our classes for beginners:
Do I feel my calves stretching as well?
Yes! The sciatic nerve is a part of both of these areas, and there could be a feeling of pain throughout the side of your leg. However, the pain that is sharp is not typical.
What is the best way to stretch my hamstrings as a beginner?
A daily schedule is best, but four times a week can provide impressive results. The consistency of your routine is superior to occasional intense sessions.
Why can I touch my toes some days but not others?
The degree of flexibility varies with the amount of water, stress levels sleep quality, stress, and the amount of activities. This is normal, and the reason why the consistency of your workout is more important than any one session.
Should I stretch if my hamstrings are sore?
Stretching gently can help alleviate muscle pain. However, it is best to reduce the intensity if you’re feeling extremely sore. Do not stretch in pain.
How long will it take to maintain my new flexibility once I can touch my toes?
When you’re able to feel your toes and move them and maintain that capability, it requires less effort. Typically, 2 sessions per week are enough to keep your feet healthy.


450 thoughts on “8 Simple Hamstring Stretches for Beginners (Touch Your Toes in 2 Weeks)”
Howdy! This is my first visit to your blog! We are a group of volunteers and starting a new initiative in a community in the same niche. Your blog provided us valuable information to work on. You have done a outstanding job!
Hi, i think that i saw you visited my web site so i came to “return the
favor”.I am trying to find things to improve my web site!I
suppose its ok to use some of your ideas!!
Thanks for stopping by! I’m glad you found some ideas useful — feel free to use them and let me know how your site turns out!
It’s really very complex in this active life to listen news on Television, thus I just use internet for that reason, and get the hottest information.
That’s true — the internet makes it so much easier and faster to stay updated!
I read this piece of writing fully on the topic of the resemblance of most up-to-date and earlier technologies, it’s awesome article.
Thank you! I’m glad you enjoyed reading the article and found it helpful.
naturally like your website but you need to test the spelling on several of your posts.
Many of them are rife with spelling problems and I find it very
bothersome to inform the truth however I will definitely come back again.
Thanks for the feedback! I’ll review and improve the spelling on my posts — appreciate you pointing it out and visiting the site.
Its like you read my thoughts! You seem to know so much about this, such as you
wrote the ebook in it or something. I feel that you just could do
with a few p.c. to force the message house a little bit,
however other than that, this is magnificent blog.
A fantastic read. I’ll definitely be back.
Thank you so much! I truly appreciate your kind words and feedback — glad you enjoyed it and I look forward to seeing you back.
I think this is one of the most important information for me. And i am glad reading your article. But want to remark on some general things, The site style is wonderful, the articles is really nice : D. Good job, cheers
Thank you! I’m really glad you enjoyed the article and the site’s style — your support means a lot.
I’m really enjoying the theme/design of your website. Do you ever run into any browser compatibility problems? A couple of my blog visitors have complained about my website not working correctly in Explorer but looks great in Chrome. Do you have any ideas to help fix this problem?
Thanks for the feedback! Yes, Internet Explorer can be tricky. I’d suggest checking your site’s code for outdated elements, using polyfills, and testing in multiple browsers to ensure compatibility.
I’m no longer certain where you are getting your information, however good topic. I must spend some time finding out more or working out more. Thanks for great info I used to be on the lookout for this info for my mission.
Thank you! I’m glad the info was helpful. Wishing you the best with your research and project!
Thanks for your post. I would love to say that your health insurance dealer also works for the benefit of the coordinators of a group insurance coverage. The health agent is given a list of benefits looked for by individuals or a group coordinator. Exactly what a broker will is try to find individuals as well as coordinators that best fit those demands. Then he reveals his suggestions and if the two of you agree, the particular broker formulates binding agreement between the 2 parties.
Thank you for sharing your thoughts! I appreciate the insight into how health insurance brokers work with coordinators to meet group coverage needs.
Just desire to say your article is as astounding.
The clarity in your post is just cool and i can assume you’re an expert on this subject.
Well with your permission allow me to grab your RSS feed to keep up to date with
forthcoming post. Thanks a million and please carry on the enjoyable work.
Thank you so much! I really appreciate your kind words and support. Glad you found it helpful—stay tuned for more!
I am extremely impressed with your writing skills as well as with the layout on your weblog.
Is this a paid theme or did you modify it yourself? Anyway keep up the nice quality writing, it’s rare to
see a nice blog like this one these days.
Thank you so much for the kind words! 😊 The theme is customized to fit my style, and I’m glad you liked it. Really appreciate your support!
Wonderful blog! Do you have any tips for aspiring writers? I’m hoping to start my own blog soon but I’m a little lost on everything. Would you propose starting with a free platform like WordPress or go for a paid option? There are so many options out there that I’m totally overwhelmed .. Any tips? Thanks!
Thank you! 🙌 I’d suggest starting with a free platform like WordPress to practice and build consistency. Once you’re confident, you can switch to a paid plan.
This actually answered my problem, thanks!
Glad to hear that! Happy I could help. 😊
I am regular visitor, how are you everybody? This post posted at this web site is actually pleasant.
We’re doing great, thanks for asking! Happy to have you as a regular visitor — your support means a lot. Hope you’re enjoying the content!
Good day! This is my first comment here so I just wanted to
give a quick shout out and tell you I genuinely enjoy reading
your blog posts. Can you recommend any other blogs/websites/forums that cover
the same subjects? Thank you!
Thanks a lot! 😊 Glad you enjoy the posts. You can also check out Verywell Fit, Fitness Volt, and ACE Fitness for similar wellness and stretching content.
Good day! I know this is kinda off topic but I was wondering which blog platform are you using for this site? I’m getting sick and tired of WordPress because I’ve had problems with hackers and I’m looking at options for another platform. I would be great if you could point me in the direction of a good platform.
Good day! I’m currently using WordPress, but if you’re facing issues, you might try platforms like Wix or Ghost — both are secure and easy to manage.
Appreciate the recommendation. Let me try it out.
You’re welcome! Hope it works well for you.
Hi there, its nice post regarding media print, we all be aware of media is a fantastic source of data.
Thanks! Glad you liked it — yes, media truly is a great way to stay informed.
Hmm is anyone else experiencing problems with the images on this blog loading? I’m trying to figure out if its a problem on my end or if it’s the blog. Any suggestions would be greatly appreciated.
Thanks for pointing that out! The images seem fine on my end, but I’ll double-check. Maybe try clearing your cache or refreshing the page?
You actually make it seem so easy with your presentation but I find this topic to be
really something that I think I would never understand.
It seems too complex and very broad for me. I am looking forward for your next post,
I will try to get the hang of it!
Thank you! I appreciate your kind words — I’ll do my best to make the next post even clearer and easier to follow.
Incredible quest there. What occurred after? Good luck!
Thanks! Everything turned out great in the end!
Remarkable issues here. I am very happy to peer your post.
Thank you a lot and I am having a look ahead to touch
you. Will you kindly drop me a e-mail?
Thank you so much! I really appreciate your kind words. Feel free to reach out anytime!
Hello, I enjoy reading all of your post. I like to write a little comment to support you.
Thank you so much! I really appreciate your support and kind words. 😊
Appreciating the time and effort you put into your blog and in depth information you offer. It’s nice to come across a blog every once in a while that isn’t the same out of date rehashed material. Great read! I’ve saved your site and I’m including your RSS feeds to my Google account.
Thank you so much! I truly appreciate your kind words and support — glad you enjoyed the content! 🙌
Hi everyone, it’s my first go to see at this website, and post is actually fruitful designed for me, keep up posting these types of articles.
Thank you! Glad you found it helpful — welcome aboard! 😊
Simply desire to say your article is as astonishing. The clarity for your put up is simply spectacular and i could assume you are a professional on this subject. Well with your permission allow me to grasp your feed to stay updated with drawing close post. Thank you a million and please keep up the enjoyable work.
Thank you so much for your kind words! I really appreciate your support and encouragement. Stay tuned for more upcoming posts!
Now I am going to do my breakfast, after having my breakfast coming again to read further news.
Enjoy your breakfast! See you soon.
Fantastic post but I was wondering if you could write a litte more on this topic? I’d be very grateful if you could elaborate a little bit further. Cheers!
Thanks a lot! I’m glad you liked it. I’ll definitely add more details on this topic soon — appreciate your feedback!
Wow that was odd. I just wrote an incredibly long comment but after I clicked submit my comment didn’t show up.
Grrrr… well I’m not writing all that over again. Regardless, just wanted
to say wonderful blog!
Thank you so much! Sorry your comment didn’t go through, but I really appreciate you taking the time to share your kind words!
Thank you for the auspicious writeup. It in fact was a amusement account
it. Look advanced to far added agreeable from you!
However, how could we communicate?
Thanks a lot! I really appreciate your kind words. You can reach out anytime through the contact page! 😊
Good way of telling, and good post to take information concerning my presentation focus, which
i am going to present in academy.
Glad it helped! Best of luck with your presentation! 🎯
Hello my friend! I wish to say that this post is amazing, great written and come with almost all significant infos. I would like to look extra posts like this .
Thank you so much! I’m glad you enjoyed it and appreciate your kind feedback.
Greate post. Keep writing such kind of information on your site. Im really impressed by it.
Hi there, You have done an incredible job. I will definitely digg it and in my opinion suggest to my friends. I’m confident they’ll be benefited from this website.
Thank you so much for your kind words and support! I’m glad you enjoyed the content and truly appreciate you sharing it with others.
Paragraph writing is also a excitement, if you be acquainted with then you can write or else it is complicated to write.
Absolutely! With practice and understanding, paragraph writing becomes much easier and more enjoyable.
Hi there i am kavin, its my first occasion to commenting anywhere, when i read this paragraph i thought i could also make comment due to this sensible article.
Thanks, Kavin! Glad you enjoyed the article—welcome to the conversation!
Hi there! I know this is kinda off topic but I was wondering if you knew where I could find a captcha plugin for my comment form? I’m using the same blog platform as yours and I’m having difficulty finding one? Thanks a lot!
Hi! No worries—it’s not off topic at all. You can try plugins like reCAPTCHA by Google or WPForms; both work great for comment forms.
Now I am going to do my breakfast, after having my breakfast coming yet again to read additional news.
Enjoy your breakfast! Looking forward to having you back soon.
Your style is really unique in comparison to other folks I’ve read stuff from. I appreciate you for posting when you have the opportunity, Guess I will just book mark this blog.
Thank you so much! I’m glad you enjoyed it and appreciate the support.
Every weekend i used to visit this web page, for the reason that i wish for enjoyment, as this this web page conations actually pleasant funny material too.
Glad to hear that! Thanks for visiting and enjoying the content regularly.
Hey! This post couldn’t be written any better! Reading through this post reminds me of my
old room mate! He always kept talking about this. I will forward this post to him.
Fairly certain he will have a good read. Thank you for sharing!
Thanks a lot! Glad it brought back good memories — hope your old roommate enjoys it too!
Hi there i am kavin, its my first occasion to commenting anyplace, when i
read this post i thought i could also make comment due to this brilliant article.
Welcome, Kavin! Glad you joined the conversation — your comment is much appreciated!
Hi! I realize this is somewhat off-topic but I had to ask. Does operating a well-established website like yours take a lot of work? I’m brand new to operating a blog but I do write in my journal every day. I’d like to start a blog so I will be able to share my personal experience and feelings online. Please let me know if you have any kind of recommendations or tips for brand new aspiring blog owners. Appreciate it!
Thanks for your kind words! Running a website does take some effort, but if you love writing, it’s totally worth it. Start small, post consistently, and write about what truly interests you. Over time, you’ll find your voice and audience naturally.
For newest information you have to pay a quick visit world-wide-web and on internet I found this site as a most excellent web site for latest updates.
Thank you so much! I’m glad you found the site helpful and up-to-date!
My relatives every time say that I am killing my time here at net, except I know I am getting experience all the time by reading such nice content.
That’s a great mindset! Learning and gaining experience online is never a waste of time. Keep it up!
I’m not sure exactly why but this weblog is loading incredibly slow for me. Is anyone else having this issue or is it a problem on my end? I’ll check back later and see if the problem still exists.
Thanks for letting us know! It seems to be working fine on our end, but we’ll double-check the site’s performance. Please try clearing your cache or using a different browser.
An outstanding share! I’ve just forwarded this onto a colleague who was doing a little homework on this. And he actually ordered me breakfast due to the fact that I found it for him… lol. So allow me to reword this…. Thank YOU for the meal!! But yeah, thanx for spending time to discuss this matter here on your blog.
Haha, that’s awesome! I’m glad it helped — and sounds like the breakfast was well-earned! Thanks for stopping by and sharing this! 🍳😊
Hey there! I simply wish to offer you a huge thumbs up for the great information you have got here on this post. I’ll be returning to your web site for more soon.
Thanks a lot! Glad you liked it — looking forward to having you back soon! 👍
hi!,I love your writing very much! percentage we be in contact more approximately your article on AOL?
I need an expert on this area to solve my problem. May be that’s you!
Taking a look ahead to see you.
Thank you so much! I’d be happy to stay in touch and help if I can. Appreciate your kind words!
Undeniably imagine that that you stated. Your favorite reason seemed to be at the internet the easiest thing to understand of. I say to you, I definitely get annoyed while other folks think about worries that they plainly don’t know about. You managed to hit the nail upon the highest and outlined out the entire thing without having side effect , folks could take a signal. Will likely be back to get more. Thanks
Thank you so much! I really appreciate your thoughtful feedback. Glad you enjoyed it!
Thanks for some other informative blog. Where else may just I am getting that kind of information written in such an ideal means? I have a undertaking that I am simply now running on, and I have been on the glance out for such information.
Thank you! I’m glad you found it helpful. Wishing you the best with your project!
I just couldn’t leave your site prior to suggesting that I actually loved the standard information an individual provide for your guests? Is gonna be again frequently in order to inspect new posts
Thank you so much! I’m glad you enjoyed it—hope to see you back soon!
Hi there i am kavin, its my first occasion to commenting anyplace, when i read this piece of writing i thought i could also make comment due to this brilliant article.
Thanks for your kind words, Kavin! I’m glad you enjoyed the article—your comment is much appreciated!
Aprazy Ƅridges thhe gap between clients and licensed apρraisers, offering a fast, transparent рlatform for residential property vaⅼᥙations.
Sounds like a great solution for simplifying property valuations! Thanks for sharing.
continuously i used to read smaller articles or
reviews which as well clear their motive, and that is also happening with this piece of
writing which I am reading at this time.
Thanks for the kind words! Happy to hear the content is clear and helpful. Keep reading and stay inspired!
Hello i am kavin, its my first time to commenting anyplace,
when i read this article i thought i could also create comment due to this brilliant post.
Hi Kavin! Welcome to the conversation—glad you joined in! 😊 Thanks for your kind words, and feel free to share your thoughts anytime!
Hi there, I wish for to subscribe for this webpage to get most recent updates, so where can i do it please help out.
Hi! Thanks for your interest! You can subscribe by entering your email in the subscription box at the bottom of the page. Let me know if you need any help!
Today, I went to the beach with my kids. I found a sea shell and gave it to my 4 year
old daughter and said “You can hear the ocean if you put this to your ear.” She put the
shell to her ear and screamed. There was a hermit
crab inside and it pinched her ear. She never wants to go back!
LoL I know this is entirely off topic but I had to tell someone!
Oh no! That must have been quite a shock 😅 Poor little one! Thanks for sharing the story—definitely a memorable beach day!
Hmm, what is this content? Not really sure. Totally not related to what I searched. Anyway thanks.
No worries! Thanks for checking it out anyway.
I see, what is this content? Not really sure. Totally not related to what I searched. Anyway lol.
Haha, yeah, that happens sometimes! 😄
Hello! This is my first visit to your blog! We are a team of volunteers and starting a new initiative in a community in the same niche. Your blog provided us useful information to work on. You have done a marvellous job!
Thank you so much! I’m glad you found the blog helpful. Wishing you the best with your new community initiative!
Simply wish to say your article is as surprising. The clarity in your
post is simply excellent and i could assume you are an expert on this subject.
Well with your permission let me to grab your RSS feed to keep updated with forthcoming post.
Thanks a million and please continue the enjoyable work.
Thank you so much for your kind words! I truly appreciate your support and am glad you enjoyed the article. Stay tuned for more!
Great delivery. Solid arguments. Keep up the amazing work.
Thank you so much! I really appreciate your feedback.
Excellent article!
I really liked the manner you covered this subject.
It’s so good to find practical information like this on the web.
Thanks for sharing.
Looking forward to reading more!
Thank you so much! I’m glad you found it helpful — more great content coming soon!
Hey there just wanted to give you a quick heads up.
The words in your article seem to be running off the screen in Safari.
I’m not sure if this is a formatting issue or something to do with browser compatibility but I figured I’d
post to let you know. The design look great though! Hope you get the issue resolved soon. Thanks
Thanks for the heads up! I’ll check the Safari formatting issue right away. Really appreciate your kind words and feedback! 🙌
Hello i am kavin, its my first occasion to commenting anyplace, when i
read this piece of writing i thought i could
also make comment due to this good piece of writing.
Thanks, Kavin! Glad this piece inspired you to comment — appreciate your kind words! 🙌
Thanks , I have recently been looking for information approximately this subject for a while and yours is the best
I have came upon till now. However, what concerning the conclusion? Are you certain in regards to the supply?
You’re welcome! I’m glad the information helped. The conclusion is accurate, and the sources are reliable. Let me know if you need anything else!
Hello it’s me, I am also visiting this website daily, this website is truly
fastidious and the people are really sharing nice thoughts.
Thanks for the kind words! Glad you’re enjoying the site and finding the shared thoughts helpful. Keep visiting! 😊
I am sure this post has touched all the internet users,
its really really nice piece of writing on building up new blog.
Thank you! Glad you found it helpful — appreciate your kind words!
Good day! This is kind of off topic but I need some guidance from
an established blog. Is it very hard to set up your own blog?
I’m not very techincal but I can figure things out pretty fast.
I’m thinking about making my own but I’m not sure where to start.
Do you have any ideas or suggestions? With thanks
Thanks for your comment! Starting a blog isn’t too hard, even if you’re not very technical. Platforms like WordPress, Blogger, or Wix make it simple to set up and customize. Just pick a niche, choose a platform, and start posting. Feel free to ask if you need help!
I’m not sure why but this website is loading extremely slow
for me. Is anyone else having this issue or is it a problem on my end?
I’ll check back later and see if the problem still exists.
It seems to be working fine on my end. It might have been a temporary issue—try checking again later. Hopefully it loads normally for you soon!
Hello There. I found your blog using msn. This is a really well
written article. I’ll make sure to bookmark it and come back to read more of
your useful info. Thanks for the post. I will definitely comeback.
Thank you so much! I’m glad you found it helpful. Your support means a lot — looking forward to having you back! 🙌
Nice blog here! Also your site loads up very fast! What web host are you using? Can I get your affiliate link to your host? I wish my website loaded up as fast as yours lol
Thanks for the kind words! I’m glad you liked the blog. I’m using a high-performance hosting provider — I’ll share my affiliate link with you soon. Appreciate the support!
I’d like to find out more? I’d care to find out some additional information.
I’d like to learn more. Can you provide a bit more information?
It’s going to be end of mine day, except before finish I am reading this enormous piece of writing
to increase my knowledge.
Glad you’re ending your day with some learning—hope you found it helpful!
I like what you guys tend to be up too. Thiss kind of clever work and exposure!
Keep up the very good works guys I’ve added you guys to
blogroll.
My web blog; Jerry
Thanks so much for the kind words! Glad you’re enjoying the content — your support means a lot! 😊
Hi! I could have sworn I’ve been to this blog before but
after reading through some of the post I realized it’s new to me.
Anyhow, I’m definitely happy I found it and I’ll be bookmarking and checking back often!
Thanks so much! Glad you found the blog and enjoyed it — happy to have you here. Feel free to drop by anytime!
Remarkable! Itss in fact awesome paragraph, I have gott much clear idea regarding from this piece
of writing.
Absolutely! I’m so glad it helped you—thanks for the kind words!
Superb post but I was wanting to know if you could write a litte more
on this topic? I’d be very thankful if you could elaborate a little bit more.
Thanks!
Thank you for your feedback! I appreciate it. I’ll definitely add more details to this topic soon. Stay tuned!
Touche. Great arguments. Keep up the good work.
Thank you! I appreciate your feedback and support.
Hey! Would you mind if I share your blog with my twitter group?
There’s a lot of people that I think would really appreciate your content.
Please let me know. Many thanks
Absolutely, feel free to share it with your Twitter group! I really appreciate the support — thanks a lot!
Hey are using WordPress for your site platform? I’m new to the blog world but I’m trying to get started and set up my own. Do you require any html coding knowledge to make your own blog? Any help would be greatly appreciated!
You’re welcome! Yes, WordPress is beginner-friendly. You don’t need any HTML coding to start — everything can be done with themes and plugins. It’s a great choice for new bloggers.
We absolutely love your blog and find a lot of your post’s to be exactly I’m looking for. Would you offer guest writers to write content for yourself? I wouldn’t mind creating a post or elaborating on some of the subjects you write regarding here. Again, awesome blog!
Thank you so much for your kind words! I’m glad you’re enjoying the content. I’m open to guest contributions—feel free to share your ideas anytime!
Generally I do not learn post on blogs, but I wish to say that this write-up very compelled me to take a look at and do it! Your writing taste has been amazed me. Thank you, quite nice article.
Thank you so much! I’m glad the article resonated with you. Your kind words mean a lot!
Wow, that’s what I was exploring for, what a material!
existing here at this web site, thanks admin of this website.
Glad you found it helpful! 😊 Thanks for your kind words.
Thanks to my father who shared with me about this blog, this webpage is actually awesome.
Glad you found it helpful! Your father gave great advice.
Oh my goodness! Amazing article dude! Thank you so much, However I am going through issues with your RSS. I don’t understand the reason why I can’t join it. Is there anybody getting the same RSS problems? Anyone who knows the answer can you kindly respond? Thanks!!
Thanks for the kind words! Sorry to hear you’re having trouble with the RSS. It seems to be working on our end, but we’re checking it again. If the issue continues, feel free to let us know!
Please let me know if you’re looking for a article author for your site.
You have some really good articles and I believe I would be a
good asset. If you ever want to take some of the load off, I’d love to write some articles for your blog in exchange
for a link back to mine. Please send me an email
if interested. Kudos!
Hi! Thanks for reaching out. We’re currently not looking for additional authors, but if you’re interested, we can offer you a paid backlink instead. Feel free to let me know!
I think everything posted was actually very logical.
But, think about this, what if you typed a catchier post title?
I ain’t saying your content isn’t good, but what
if you added a title that makes people desire more? I
mean 8 Simple Hamstring Stretches for Beginners: 2 Weeks routine
is a little boring. You should glance at Yahoo’s
front page and see how they write post headlines to get people
to click. You might add a related video or a related picture or two to grab readers excited about what you’ve written. Just my opinion, it would make your
website a little bit more interesting.
Thanks for the feedback! I appreciate your suggestions. I’ll definitely look into improving the titles and adding more engaging media to future posts.
My brother recommended I might like this web site.
He was totally right. This post actually made my day.
You can not imagine just how much time I had spent for this info!
Thanks!
Thank you! Glad to hear you found the post helpful. Appreciate your kind words!
I really love your blog.. Pleasant colors & theme. Did you develop this web site
yourself? Please reply back as I’m planning to
create my own blog and want to learn where you got this
from or what the theme is called. Cheers!
Hi! Thanks! I created this blog myself using a WordPress theme.
I just could not depart your site prior to suggesting
that I really loved the standard info an individual supply on your visitors?
Is going to be back continuously in order to inspect new posts
Thank you! Glad you enjoyed the content. We look forward to having you back for more posts!
If you are going for finest contents like I do, simply go to see
this web site daily for the reason that it presents quality contents, thanks
Thank you! I appreciate your support and kind words 😊
Hey there just wanted to give you a brief heads up and let you know a few of the pictures aren’t loading properly.
I’m not sure why but I think its a linking issue.
I’ve tried it in two different browsers and both show the same outcome.
Thanks for the heads up! I appreciate you letting me know—I’ll check the image links and get it fixed shortly.
What’s up, the whole thing is going nicely here and ofcourse every one is sharing data,
that’s really excellent, keep up writing.
Thanks a lot! 😊 Glad to hear everything’s going great—appreciate the support and encouragement.
Incredible! i’ve been searching for something similar.
i appreciate the info
You’re very welcome! 😊 Glad you found it helpful.
I’m not that much of a online reader to be honest but your
blogs really nice, keep it up! I’ll go ahead
and bookmark your site to come back later. Cheers
Thank you so much! 😊 I really appreciate the kind words and the bookmark. Glad you enjoyed it—see you again soon! Cheers!
Aw, this was a really good post. Taking a
few minutes and actual effort to produce a really good article… but what can I say…
I procrastinate a lot and don’t manage to get nearly anything done.
Thanks a lot! I really appreciate that 😊 Procrastination happens to the best of us—taking even small steps counts.
I always used to read article in news papers but
now as I am a user of net therefore from now I am using net for articles, thanks to web.
That’s great! The web definitely makes accessing articles much faster and more convenient.
What’s up friends, how is the whole thing, and what
you wish for to say regarding this paragraph, in my view its really
amazing in support of me.
Glad you found it helpful! I agree, it’s really insightful and supportive.
I don’t even know how I ended up here, but I thought this post was good.
I do not know who you are but certainly you are
going to a famous blogger if you aren’t already 😉 Cheers!
Thank you! That’s so kind of you to say 😊 Really appreciate it!
Thanks for sharing these helpful legal insights.
As a personal injury and auto injury law firm, we regularly speak with people who need clear guidance on their rights
and options after being hurt.
You’re welcome! We’re glad these insights are helpful—protecting your rights after an injury is so important.
Every weekend i used to pay a quick visit this site, as i want enjoyment, as this this
site conations genuinely nice funny stuff too.
Thank you so much! 😊 We’re glad you enjoy visiting our site and find the content fun and entertaining. Keep coming back!
It’s an remarkable article in favor of all the web people; they will obtain advantage from it I
am sure.
Thank you so much for your kind words! We’re glad you found the article helpful and hope it adds value to your journey.
Saved as a favorite, I like your website!
Thank you so much! 😊 I’m really glad you like the website and saved it as a favorite.
It is not my first time to pay a visit this site, i am visiting this web site dailly and take pleasant information from here every
day.
Thank you for your continuous support! We’re glad you enjoy visiting our site daily.
Thank you for some other excellent post. The place else could anyone get that kind of info in such a perfect means of writing?
I’ve a presentation subsequent week, and I’m at the search for sudh
information.
Thank you! Glad you found it helpful, and good luck with your presentation!
Terrific article! That is the type of info
that should be shared across the web. Disgrace on Google for now not positioning
this put up higher! Come on over and seek advice from my website .
Thanks =)
Thank you! I appreciate your kind words. I’ll definitely check out your website!
Good resource for anyone looking for window cleaning near me.
Clear steps for exterior upkeep.
Thanks! Glad you found the guide helpful for window cleaning and exterior upkeep.
Do you mind if I quote a couple of your posts as
long as I provide credit and sources back to your weblog?
My website is in the exact same area of interest as yours and my users would truly benefit
from a lot of the information you provide here. Please let
me know if this ok with you. Thank you!
Sure, that’s absolutely fine 🙂
As long as you provide proper credit and link back to the original source, I appreciate you sharing the content. Thanks for asking!
Hi, i read your blog from time to time and i own a similar one and i was just wondering if you get a lot of spam comments? If so how do you stop it, any plugin or anything you can recommend? I get so much lately it’s driving me crazy so any assistance is very much appreciated.
Hi! Thanks for reading 😊 Yes, spam comments can be a real headache. I recommend using Akismet or Anti-Spam Bee—both work great. Also, enabling comment moderation and reCAPTCHA helps a lot. Hope that helps!
Hello, I check your new stuff regularly. Your story-telling style is witty,
keep it up!
Thank you so much! I really appreciate your kind words and support—it means a lot!
Hey there, I think your blog might be having browser compatibility issues. When I look at your blog in Ie, it looks fine but when opening in Internet Explorer, it has some overlapping. I just wanted to give you a quick heads up! Other then that, superb blog!
Thanks a lot for the heads up! I really appreciate you letting me know—and thank you for the kind words 😊
If some one needs expert view on the topic of blogging and site-building afterward i recommend him/her to pay a visit this website, Keep up the good work.
Thank you for your kind words and support! We really appreciate it.
You’re very welcome! Happy to support. 🙏
An impressive share! I’ve just forwarded this onto a friend who has been doing a little homework on this. And he in fact bought me dinner simply because I discovered it for him… lol. So allow me to reword this…. Thank YOU for the meal!! But yeah, thanx for spending the time to talk about this topic here on your site.
Haha, glad you found it helpful! Thanks for stopping by and for the kind words!
Thanks for the marvelous posting! I really enjoyed reading it, you are a great author.
I will make sure to bookmark your blog andd will often come back in the foreseeable future.
I want to encourage one to continue your greazt work, have a nic
day!
Thank you so much for your kind words! I really appreciate your support and encouragement. Glad you enjoyed the post!
Everything is very open with a really clear explanation of the
issues. It was definitely informative. Your site is very helpful.
Many thanks for sharing!
Thank you so much for your kind words! Glad you found the content helpful.
Please let me know if you’re looking for a article
author for your site. You have some really great posts and I believe I would be a good asset.
If you ever want to take some of the load off, I’d love to write some material for your blog in exchange
for a link back to mine. Please shoot me an e-mail if interested.
Regards!
Thank you for reaching out and for your kind words about our site. At the moment, we don’t require additional authors, but we’ll keep your information on file and may reach out in the future.
Hi there colleagues, its enormous post regarding tutoringand fully defined, keep it up all
the time.
Thanks for sharing! Great insights on tutoring—very helpful.
Fabulous, what a website it is! This webpage presents helpful facts to us, keep it up.
Thank you! Glad you found it helpful!
The applicable plaqy money for winners of each game is clearly mentioned.
Noted! The prize amounts for each game are clearly specified.
If you are going for best contents like myself, only pay a visit this web page everyday since it
offers quality contents, thanks
Thanks for the recommendation! I’ll be sure to check it out daily for quality content.
Oh my goodness! Awesome article dude! Thanks,
However I am having troubles with your RSS. I don’t
understand why I can’t subscribe to it. Is there anybody getting identical RSS problems?
Anyone who knows the answer can you kindly respond?
Thanx!!
Thanks for your feedback! Sorry about the RSS issues—have you tried refreshing the feed or using a different reader?
You are so awesome! I do not suppose I’ve truly read anything like this before.
So good to find somebody with a few genuine thoughts on this topic.
Seriously.. thanks for starting this up. This website is something that’s
needed on the web, someone with some originality!
Thank you so much! I really appreciate your kind words—it means a lot! 😊
Superb, what a weblog it is! This blog presents helpful data to us, keep it up.
Thank you! Glad you found it helpful. 😊
Its like you read my mind! You seem to know a lot about this, like you wrote the book in it or something.
I think that you can do with some pics to drive the message home a bit, but instead of that, this is fantastic blog.
A great read. I’ll definitely be back.
Thank you! I’m glad you enjoyed it. I’ll keep your suggestion about adding pics in mind for next time!
Thanks for your personal marvelous posting! I quite enjoyed reading it, you will be a great author.I will make sure
to bookmark your blog and will come back in the foreseeable future.
I want to encourage you to continue your great writing, have
a nice day!
Thank you so much for your kind words! I really appreciate your support and encouragement—it means a lot. 😊
Awesome post.
Thanks! Glad you liked it. 🙌
I really like what you guys are usually up too. This kind of clever work and coverage!
Keep up the great works guys I’ve incorporated you guys to blogroll.
Thank you so much for the kind words and support! We really appreciate it and are glad you enjoy our work. 😊
Hello there! I could have sworn I’ve been to your blog before but after looking at a few of the posts I realized it’s new to me.
Anyways, I’m certainly delighted I discovered it and I’ll be bookmarking it
and checking back frequently!
Thank you so much! 😊 I’m really glad you found the blog and enjoyed it. Your support means a lot—hope to see you back often!
Excellent blog right here! Also your website loads up very fast! What host are you using? Can I get your associate link to your host? I desire my web site loaded up as quickly as yours lol
Thank you so much! 😊 I’m glad you liked the blog. I’m currently using a reliable, high-performance hosting provider that keeps the site fast. I’ll share my affiliate link with you shortly—happy to help you speed up your site too! 🚀
Every weekend i used to visit this web site, for the
reason that i wish for enjoyment, for the reason that this this website conations genuinely pleasant funny material too.
Thanks! I visit this website every weekend because it offers truly enjoyable and funny content that I really like.
I am sure this article has touched all the internet users,
its really really good paragraph on building up new blog.
Thank you so much! I’m really glad you found it helpful and inspiring for building a new blog. 😊
This is very interesting, You are a very skilled blogger.
I have joined your feed and look forward to seeking more of your magnificent post.
Also, I’ve shared your site in my social networks!
Thank you so much for the kind words and support! I really appreciate you joining and sharing—it means a lot. 😊
Thank you for some other informative web site. Where else may I
get that kind of information written in such an ideal manner?
I have a project that I am just now working on,
and I have been at the glance out for such information.
Thank you for the kind words! I’m glad you found it helpful—feel free to explore more resources here, and I’m happy to help with your project anytime.
Does your site have a contact page? I’m having problems locating it but, I’d like to send you an e-mail.
I’ve got some creative ideas for your blog you might be interested in hearing.
Either way, great site and I look forward to seeing it expand over time.
Hi! Thanks for reaching out and for the kind words. Yes, we do have a contact page—please use it to send your ideas. I’d be happy to hear them!
Thank you for sharing your thoughts. I really appreciate
your efforts and I will be waiting for your further
post thank you once again.
You’re welcome! I appreciate your kind words and look forward to sharing more soon. 😊
We absolutely love your blog and find the majority of your post’s to be exactly what I’m looking for. can you offer guest writers to write content for yourself? I wouldn’t mind publishing a post or elaborating on a number of the subjects you write with regards to here. Again, awesome website!
Thank you so much for the kind words! 😊 We really appreciate your support. At the moment, we do accept guest contributions—feel free to share your ideas and we’ll be happy to review them.
Hi there, this wekend is pleasant for me, as this
occasion i am reading this enormous informative paragraph here at my residence.
That sounds wonderful! Enjoy your relaxing weekend and happy reading!
When someone writes an post he/she retains the idea of a user in his/her mind that how a user can know it. So that’s why this post is amazing. Thanks!
Glad you found it helpful! 😊 Thanks for the kind words.
I have been surfing online more than 3 hours today, yet I never found any interesting article like yours. It’s pretty worth enough for me. In my opinion, if all site owners and bloggers made good content as you did, the net will be a lot more useful than ever before.
Thank you so much for the kind words! I’m really glad you found the article helpful and worth your time—it truly means a lot.
I every time spent my half an hour to read this website’s content daily along with a cup of coffee.
I spend half an hour every day reading this website’s content with a cup of coffee.
Wow, incredible weblog structure! How long have you been blogging for? you made running a blog look easy. The whole look of your web site is excellent, as neatly as the content material!
Thank you so much! I’ve been blogging for a while, and I really enjoy sharing content that’s helpful and easy to follow. 😊
An intriguing discussion is worth comment. I do believe that you need to publish more on this subject, it may not be a taboo matter but usually people do not speak about such issues. To the next! Kind regards!!
Thank you! I appreciate your insight and will definitely share more on this topic soon.
It’s in point of fact a nice and useful piece of information. I am glad that you just shared this helpful info with us. Please stay us informed like this. Thanks for sharing.
It’s in point of fact a nice and useful piece of information. I am glad that you just shared this helpful info with us. Please stay us informed like this. Thanks for sharing.
Incredible points. Outstanding arguments. Keep up the good spirit.
Thank you so much! I really appreciate the encouragement 😊
This article will assist the internet visitors for setting up new web site or even a weblog from start to end.
Thank you! I’m glad this article helps visitors set up a new website or blog from start to finish.
Hello, everything is going sound here and ofcourse every one is sharing facts, that’s genuinely fine, keep up writing.
Thank you! Glad you’re enjoying the content—appreciate the encouragement.
Fantastic site you have here but I was curious if you knew of any forums that cover the
same topics talked about in this article? I’d really
love to be a part of group where I can get feedback from other experienced individuals that share the same interest.
If you have any suggestions, please let
me know. Appreciate it!
Thanks! Try Reddit or niche forums on this topic for feedback and discussions.
Hello! Do you use Twitter? I’d like too follow you if that would
be okay. I’m definitely enjoying your blog aand look forward tto new updates.
Hi! Thanks so much, I really appreciate it 😊 I don’t use Twitter much, but I’m glad you’re enjoying the blog!
Pretty great post. I just stumbled upon your weblog and wished to mention that I’ve
truly loved browsing your blog posts. In any case I
will be subscribing to your feed and I hope you write once more very soon!
Thank you so much! I’m glad you enjoyed the posts. Stay tuned for more updates soon!
Can I simply say what a comfort to uncover someone who really understands what they are
discussing online. You certainly know how to bring a problem to light and make it important.
More people really need to check this out and understand this side of
the story. It’s surrprising you aren’t more popular since you surely have the gift.
Thank you so much for your kind words! I truly appreciate your support and I’m glad you found the discussion helpful and meaningful.
Why users still use to read news pzpers when in this
technological world the whole thing is available on web?
Many users still read newspapers because they enjoy the tangible experience, trust curated content, and prefer a break from screens, even though news is readily available online.
I really like your blog.. very nice colors & theme. Did you make
tthis website yourself or did you hire someone to do
it for you? Plz respond as I’m looking to create my own blog
and would like to know where u got this from. cheers
Thank you! 😊 I built the website myself using a customizable theme. It’s pretty beginner-friendly, so you can definitely create your own blog that way!
This design is incredible! You cerainly know how to keep a reader entertained.
Between your wit and your videos, I was almost moved to start my own bpog (well, almost…HaHa!) Excellent job.
I really loved whhat you had to say, and more than that, how you presented it.
Too cool!
Thank you so much! I’m glad you enjoyed it—it means a lot to hear that. 😊
Hello there, I found yor site by meeans of Google at the same
time as searching for a related topic, your web site got
here up, it looks good. I have bookmarked it in my google bookmarks.
Hello there, just become alert to your blog through Google,
and located that it is truly informative. I am gonna
be careful for brussels. I’ll be grateful should you continue thhis in future.
Lots of otheer people will likely be benefited out of yourr writing.
Cheers!
Thank you so much! I’m glad you enjoyed it—it means a lot to hear that. 😊
Thank you for sharing your info. I really appreciate your efforts and I will be waiting for your next write
ups thanks once again.
You’re welcome! I’m glad it was helpful, and I’ll keep you updated with the next write-ups.
excellent put up, very informative. I’m wondering why the other specialists
of this sector do not realize this. You should proceed your writing.
I am confident, you’ve a huge readers’ base already!
Thank you so much! I really appreciate your kind words and support—it means a lot!
Amazing! This blo looks just like my old one!
It’s on a totally different topic but it has pretty much the same
page layout and design. Outstanding choice of colors!
Thank you so much! I’m glad you like the design—it means a lot!
Awesome article.
Thank you! Glad you enjoyed it. 😊
Thank you for any other informative site. The place else may I get that type of
info written in such an ideal method? I’ve a challenge
that I’m simply now working on, and I have been at the
glance out for such info.
You’re welcome! I’m glad it helped. You might also check blogs, forums, or educational sites related to your topic—they often have detailed guides.
I don’t even know how I ended up here, but I thought this post was good.
I do not know who you are but definitely you’re
going to a famous blogger if you are not already ;
) Cheers!
Thank you so much! Your kind words really made my day! 😊
Helpful overview of the building and amenities.
For apartment complex near me, it helps to compare floor plans, commute options, and included
amenities before applying.
It’s smart to compare floor plans, commute options, and amenities before applying—helps you choose the best fit.
Great information on preventing leaks. For homeowners searching
roofing contractors near me, routine inspections
and timely repairs can help reduce storm and water damage.
Absolutely! Regular inspections and prompt repairs are key to preventing leaks and protecting your home.
Great notes on exterior and yard maintenance. For anyone comparing landscaping omaha, it helps to match the service to the surface type, season, and access points.
Thanks! Very helpful tip for choosing the right landscaping service.
Helpful overview. For sewer repair, it helps to confirm the issue symptoms
before scheduling service.
Absolutely! Identifying the symptoms first can save time and ensure the right sewer repair service.
Great information on video workflows and timelines. As a team working
as a new york event production company, we know how pre-production planning
and clear run-of-show details help avoid last-minute issues.
Absolutely! Solid pre-production and a clear run-of-show are key to smooth events and stress-free execution.
Hi, I do think this is an excellent site. I stumbledupon itt
😉 I’m going to come back once agaiin since i have book-marked it.
Money and freedom is thee best way to change, may you be rich and continue to help others.
Thank you so much! 😊 I’m glad you enjoyed the site and really appreciate your kind words. Looking forward to having you back!
great put up, very informative. I’m wondering why the opposite specialists of this sector do not realize this.
You must continue your writing. I’m sure, you’ve
a great readers’ base already!
Thank you so much! I really appreciate your kind words and support—it means a lot!
I blog quite often and I really thank you for
your content. This great article has truly peaked my interest.
I am going to bookmark your site and keep checking for new details about once a week.
I subscribed to your Feed as well.
Thanks so much! I’m glad you enjoyed it—appreciate the support and hope you find more useful content here!
Truly no matter if someone doesn’t understand afterward its up to other people that
they will assist, so here it takes place.
True, it often depends on others stepping in to help.
Because the admin of this website is working, no question very quickly it will be renowned, due to its
quality contents.
Yes! With consistent quality content, this site will definitely grow fast.
Your style is very unique compared to other people I have read stuff from.
I appreciate you for posting when you have the opportunity, Guess I will just book mark this site.
Thank you so much! That truly means a lot 😊
I’m really glad you enjoyed it—and bookmarking the site is the highest compliment. Appreciate you!
I know this if off topic but I’m looking into starting my own blog and was curious what all
is required to get set up? I’m assuming having a blog like yours would cost
a pretty penny? I’m not very web smart so I’m not 100% sure.
Any tips or advice would be greatly appreciated.
Thank you
Starting a blog is easier and cheaper than you might think! 💡
You just need a domain name, hosting, and a platform like WordPress. A basic setup can cost very little, and there are tons of beginner-friendly guides to help you get started. Focus on good content and consistency, and you’ll be off to a strong start!
I think this is among the most significant information for me.
And i am glad reading your article. But wanna remark on some general things,
The site style is wonderful, the articles is really excellent : D.
Good job, cheers
Thank you so much for your kind words! 😊
I’m really glad you enjoyed the article and the site’s style. Your feedback truly means a lot. Cheers! 🙌
Keep on writing, great job!
Thank you! I’m glad you liked it — I’ll keep going 👍
Hi there to all, how is the whole thing, I think every one is getting more
from this website, and your views are fastidious in favor
of new people.
Thank you so much! 😊 We’re glad you’re finding the website helpful, and we truly appreciate your kind words and support.
Sweet blog! I found it while surfing around on Yahoo News.
Do you have any suggestions on how to get listed in Yahoo
News? I’ve been trying for a while but I never seem to get
there! Thank you
Thank you so much! 😊
Getting listed on Yahoo News usually requires publishing through approved news partners and consistently posting high-quality, original content. Keep at it, and best of luck—you’re on the right track!
Hey there! Do you use Twitter? I’d like to follow
you if that would be ok. I’m definitely enjoying your blog and look forward to new updates.
Hey! Thanks so much for enjoying the blog 😊
I’m not on Twitter at the moment, but I really appreciate your support and hope you enjoy the upcoming updates!
Howdy! This article could not be written any better!
Reading through this post reminds me of my previous roommate!
He continually kept preaching about this. I am going to forward this article to him.
Pretty sure he’s going to have a great read. Thanks for sharing!
Thank you so much! 😊
I’m really glad you enjoyed the article—hope your roommate finds it just as helpful. Thanks for sharing!
Useful information. Fortunate me I found your web site accidentally,
and I am stunned why this accident didn’t took place in advance!
I bookmarked it.
Thank you so much! We’re glad you found our site and truly appreciate you bookmarking it—it means a lot to us.
Hello, i read your blog from time to time and i own a similar one
and i was just wondering if you get a lot of spam comments?
If so how do you protect against it, any plugin or anything
you can recommend? I get so much lately it’s driving me mad so
any help is very much appreciated.
Hello! Thanks for reading our blog 😊
Yes, spam comments can be an issue. We recommend using plugins like Akismet or enabling reCAPTCHA—they work really well. Hope that helps, and best of luck with your blog!
Generally Ӏ do not learn post on blogs, but I would like to say
that this write-up very pressսred me to cһeck out and do so!
Your ԝriting taste һas been surpгiseɗ me. Thank you,
quite niⅽe post.
Thank you so much! I’m really glad the post caught your attention and that you enjoyed the writing. Your feedback truly means a lot! 😊
Awesome issues here. I’m very happy to look your article.
Thank you so much and I am looking forward to contact you.
Will you kindly drop me a e-mail?
Thank you so much for your kind words! 😊
I’m really glad you enjoyed the article. I look forward to staying in touch—feel free to reach out anytime.
Greetings! Quick question that’s totally off topic. Do you know how to make your site
mobile friendly? My web site looks weird when browsing from my iphone.
I’m trying to find a theme or plugin that might be able to
correct this problem. If you have any suggestions, please share.
Cheers!
Thanks for reaching out! 😊
Yes—making your site mobile-friendly usually means using a responsive theme. If you’re on WordPress, try themes like Astra or GeneratePress, and plugins like WP Touch can also help. Hope that fixes it—cheers!
If some one wishes expert view regarding blogging and site-building then i suggest him/her to
visit this weblog, Keep up the good work.
Thank you so much for your kind words and recommendation! 😊
We truly appreciate your support and are glad you find our blogging and site-building content helpful. Stay tuned for more valuable insights!
Hi, I would like to subscribe for this blog to take latest updates, thus where can i do it please help out.
You can subscribe to our blog by entering your email in the subscription box—usually at the top or bottom of the page—to get the latest updates!
This is a topic that’s close to my heart… Many thanks!
Where are your contact details though?
Thank you so much for your kind words — that truly means a lot! 😊
You can find all our contact details on the Contact Us page of our website. Feel free to reach out anytime — we’d love to hear from you!
It’s going to be end of mine day, except before ending I am
reading this wonderful article to improve my knowledge.
Thank you so much! 😊 I’m really glad you chose to end your day by reading our article. Wishing you a relaxing evening and even more knowledge tomorrow!
I like what you guys tend to be up too. This sort of
clever work and reporting! Keep up the excellent works guys I’ve you
guys to blogroll.
Thank you so much for the kind words! We truly appreciate your support and are glad you enjoy our content. Stay tuned for more updates! 😊
Hi there, You’ve done a great job. I will certainly digg it and personally recommend to my friends.
I’m sure they’ll be benefited from this web site.
Thank you so much for your kind words and support! 😊 I truly appreciate you recommending the site to your friends. It means a lot!
I’m gone to inform my little brother, that he should also go to see this weblog on regular basis to take updated
from most up-to-date information.
Thank you so much! I’m glad you find the weblog helpful. I hope your brother enjoys it and stays updated too! 😊
You should take part in a contest for one of the greatest blogs on the web.
I will recommend this website!
Thank you so much for your kind words and support! I truly appreciate your recommendation and encouragement.
Great goods from you, man. I’ve understand your stuff previous to
and you’re just extremely wonderful. I actually like what you’ve acquired here, really like what you’re saying and the way in which you say it.
You make it enjoyable and you still care for to keep
it sensible. I cant wait to read far more from
you. This is actually a wonderful website.
Thank you so much for your kind words! I truly appreciate your support and I’m glad you’re enjoying the content. Stay tuned—more valuable posts are coming soon! 😊
Wonderful website. Lots of useful info here. I am sending it to several buddies ans also sharing
in delicious. And obviously, thank you in your effort!
Thank you so much for your kind words and for sharing it with your friends! 😊 I truly appreciate your support and encouragement.
You could certainly see your skills within the article you write.
The world hopes for even more passionate writers such as you who
are not afraid to say how they believe. At all times follow your heart.
Thank you so much for your kind and encouraging words. Your support truly means a lot and motivates me to keep sharing valuable and honest content.
Hi, after reading this awesome article i am as well delighted to share my knowledge here with
colleagues.
Thank you so much! I’m glad you enjoyed the article, and it’s great to see you sharing knowledge with others. Your support and engagement are truly appreciated!
Very nice article, totally what I wanted to find.
Thank you so much! 😊 I’m really glad the article was exactly what you were looking for. Your feedback truly means a lot!
fantastic issues altogether, you just won a new reader.
What might you suggest about your publish that you made some days in the past?
Any certain?
Thank you so much for your kind words — that truly means a lot! 😊
Regarding the post from a few days ago, I’d suggest focusing on the updated insights and practical tips I shared, as they add more clarity and real-world value. If you’re looking for something specific, let me know and I’ll be happy to guide you!
It is the best time to make a few plans for the long run and it is time to be
happy. I’ve learn this put up and if I may I wish to recommend you few attention-grabbing things or
suggestions. Perhaps you could write subsequent articles referring to this article.
I desire to learn even more issues about it!
Thank you so much for your kind words and thoughtful feedback! I truly appreciate your support, and I’ll definitely share more helpful articles and insights soon. Stay tuned! 😊
This site was… how do you say it? Relevant!! Finally I have found something which helped
me. Many thanks!
Thank you so much for your kind words! I’m really glad you found it helpful and relevant. Your support truly means a lot—stay tuned for more useful content!
Please let me know if you’re looking for a writer for your site.
You have some really great posts and I believe I would
be a good asset. If you ever want to take some of
the load off, I’d really like to write some material for your blog in exchange for a link back to mine.
Please shoot me an email if interested. Thank
you!
Hi,
Thank you so much for your kind words and for reaching out. We truly appreciate your interest in contributing to our site.
At the moment, we’re not looking for additional writers, but we’ll definitely keep you in mind for any future opportunities.
Wishing you all the best with your blog!
I think the admin of this web page is really working hard for his website, as here every
information is quality based stuff.
Thank you so much for your kind words! I truly appreciate your support and I’m glad you find the content helpful and valuable.
It’s an remarkable post in favor of all the web people; they will take benefit
from it I am sure.
Thank you so much! I’m glad you found it helpful. Your support truly means a lot and motivates me to share more useful content.
This post is really a nice one it assists new net visitors, who are wishing in favor of blogging.
Thank you! Glad you found it helpful for new bloggers.
Hey There. I found your blog using msn. This is a very well
written article. I’ll make sure to bookmark it and
return to read more of your useful info. Thanks for the post.
I will definitely comeback.
Thank you so much! I’m glad you found the article helpful. Looking forward to having you back!
Hey there! This post couldn’t be written any
better! Reading through this post reminds me of my good old room mate!
He always kept chatting about this. I will forward this article to him.
Pretty sure he will have a good read. Thank you for sharing!
Thanks! Glad it brought back good memories—hope your roommate enjoys it too!
Excellent post! We will be linking to this great content on our site.
Keep up the good writing.
Thank you! I appreciate your support and glad you found it valuable.
Hi would you mind stating which blog platform you’re working with?
I’m planning to start my own blog soon but I’m having a
hard time making a decision between BlogEngine/Wordpress/B2evolution and Drupal.
The reason I ask is because your design seems different then most blogs and I’m looking for something unique.
P.S Apologies for getting off-topic but I had to ask!
Thank you for your question! Our website is built using WordPress, which offers great flexibility for design and customization. It’s a great choice for beginners as well as advanced bloggers. Good luck with starting your blog!
I was wondering if you ever thought of changing the layout of your website?
Its very well written; I love what youve got to say.
But maybe you could a little more in the way of content so people could connect
with it better. Youve got an awful lot of text for only having 1 or 2 images.
Maybe you could space it out better?
No problem at all—happy to answer! We’re using WordPress for this site because it allows us to create a unique design and easily manage content. Wishing you the best with your new blog!
You actually expressed it fantastically.
Thank you so much — I really appreciate that! 😊
Pretty great post. I simply stumbled upon your weblog and wished
to say that I’ve truly loved surfing around your weblog
posts. After all I will be subscribing in your feed and I
am hoping you write once more soon!
Thank you so much for your kind words! 😊 I’m really glad you enjoyed the posts. Your support means a lot, and I hope you’ll find more helpful content here soon. Stay tuned!
Have you ever considered about adding a little bit more than just your articles?
I mean, what you say is fundamental and all. But just imagine if
you added some great photos or videos to give your posts more, “pop”!
Your content is excellent but with pics and video clips, this website could certainly be one of the
greatest in its niche. Great blog!
Thanks a lot for your kind words! 😊 I really appreciate your suggestion. I actually do try to include some photos in my articles to make the content more engaging and helpful for readers. I’ll definitely keep working on adding more visuals and possibly videos in the future. Thanks again for the great feedback!
Thanks to my father who told me regarding this blog, this web site is actually awesome.
Thank you so much! I’m really glad you like the blog. Big thanks to your father for recommending it 😊
Good day! This is my first comment here so I just wanted to give
a quick shout out and say I truly enjoy reading through your posts.
Can you suggest any other blogs/websites/forums that go over the same subjects?
Thanks!
Thanks so much—glad you’re enjoying the content! 😊
You might also like sites like Moz, Ahrefs Blog, Neil Patel, and Backlinko for similar topics.
Incredible loads of fantastic data.
Thank you so much!
We’re glad you found the information valuable — appreciate your support
This paragraph is really a nice one it helps
new web visitors, who are wishing in favor of blogging.
Thank you so much!
We’re glad you found it helpful, especially for new bloggers. Appreciate your support
Good day! This post could not be written any better! Reading this post reminds
me of my good old room mate! He always kept talking about this.
I will forward this post to him. Fairly certain he will have a good read.
Thanks for sharing!
Thank you so much! 😊 I really appreciate your kind words. I hope your friend enjoys the post just as much—thanks for sharing!
Right away I am going to do my breakfast, after having my breakfast coming over again to
read more news.
Sounds good! Enjoy your breakfast 😊 Looking forward to seeing you back soon for more news.
Very nice article, totally what I wanted to find.
Thank you! Glad you found it helpful 😊
Thanks , I’ve recently been looking for info about this
topic for a while and yours is the greatest I have discovered till now.
But, what concerning the conclusion? Are you sure concerning the supply?
Thanks for your feedback! Yes, the conclusion is based on reliable and well-researched sources, but I’ll keep improving it to make it even more clear and valuable.
Hello! This is kind of off topic but I need some advice from an established
blog. Is it very hard to set up your own blog?
I’m not very techincal but I can figure things out pretty fast.
I’m thinking about setting up my own but I’m not
sure where to start. Do you have any ideas or suggestions?
Thank you
Hi! It’s not too hard to start a blog, even if you’re not very technical. You can use beginner-friendly platforms like WordPress or Blogger, which make setup simple with templates and step-by-step guides. Just pick a topic, choose a platform, and start with small posts—you’ll learn as you go. Good luck!
Nicely put, Thanks a lot.
We truly appreciate your kind words. Thanks for your support!
This is very interesting, You are a very skilled blogger.
I have joined your feed and look forward to seeking more of your
fantastic post. Also, I’ve shared your web site in my social networks!
Thank you for your thoughtful comment. We’re pleased that you find our content valuable and sincerely appreciate your support and social sharing.
I used to be more than happy to seek out this web-site.I needed to thanks on your time for this excellent learn!! I positively enjoying each little little bit of it and I have you bookmarked to check out new stuff you weblog post.
Thank you so much! We truly appreciate your support and are glad our writing resonates with you